A properly set, elegantly-styled dinner table is one of the most low-key, but impactful interior decor tricks around.
Whether you are hosting a formal holiday meal, a Sunday dinner, or just want to elevate everyday dining from eating to a memorable experience, there is a process to follow.
There is etiquette for place settings; everybody knows the fork goes on the left side of the dinner plate, but from there, many of us don’t know where to go. And in addition, there are opportunities to infuse your table with style, to leave a lasting impression that will linger long after the meal itself.
NewHomeSource has put together 10 tips to help you master table setting like a pro.
Step 1: Space and Shape Planning
Before you start, size matters. You can have an Instagram-worthy tabletop, but if guests are bumping elbows, or if they are seated so far apart that conversation is limited, the experience of dining is diminished. Consider how many people you plan to have at the table. At least a foot and a half between chairs is considered adequate.
Round tables foster conversation best, but rectangular tables work too, as long as you arrange them mindfully.
Step 2: What is the Menu?
Although your table setting will undoubtedly be a work of art, the process starts in the kitchen, as what you are serving will ultimately dictate how you will set the table. This determines what flatware, plates and glasses you need, as well as how much “space” you have for decor.
How many courses will you have? Will you plate meals, or will dishes be passed family-style?
Pro tip: etiquette states that when passing food family-style, it should flow in a counterclockwise direction.
Step 3: Your Table is Your Canvas
Before setting down dishes or flatware, consider what the table itself looks like. For example, rich, live-edge wood should be exposed, given its natural beauty. It needs to shine in its own right.
“Let the wood stand out,”says Sybrandt Windell, the food and beverage director at the five-star luxury Acqualina Resort & Spa and The Estates at Acqualina in Sunny Isles Beach, Florida. “It works well with the rustic look that’s very popular at the moment, and when paired with earthy elements, it can be very elegant.”
Or, if you have a glass-topped table, take preventative measures by placing a table mat between the glass and a tablecloth. This will make post-meal clean up easier, protect from cracks and “will also keep the noise level down, as all that glass clinking can get very noisy,” Windell says.
Step 4: Lay the Textile Foundation
Decide whether you’ll use placemats, a tablecloth, or both. Most people turn to placemats for informal meals and tablecloths with chargers for more formal events, but there are no hard and fast rules when it comes to either. “There are times when the decor may call for using both at the same time,” Windell says. Again, keep in mind that if you’re looking to minimize sound, a placemat works wonders.
Also trending, particularly if you have a dramatic table that you’d like to showcase, or are leaning towards a more casual gathering, table runners strike the right balance between revealing the table and adding visual interest.
Step 5: Flatware 101
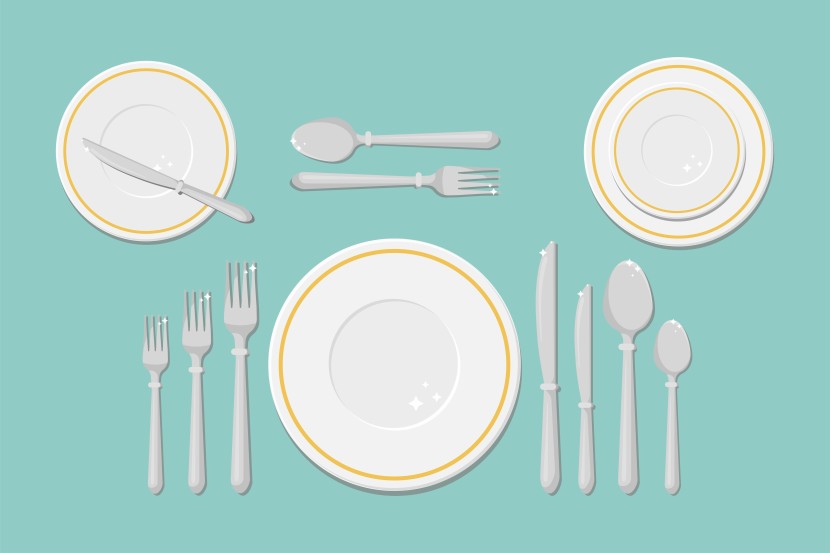
Famous etiquette expert Emily Post has set the standard for table setting for generations, with her advice on table manners and placement of utensils, still as relevant for the modern table as when she was writing about this in the 1920s and 1930s. That’s because the framework supports both function (easy, sensible access to what you need as the meal progresses) and fashion (the simple symmetry of a place setting is style in itself).
Her FORKS acronym is easy to follow and still applies when it comes to placing flatware in the right position.
Starting from the left, F is for a fork. For formal meals opt for both a salad fork and a dinner fork and place the former first, so it’s farthest from the plate. The letter O represents the shape of the plate, which is always in the center. Place the knife (K) to the right with the blade facing the plate. Next to the knife should be the spoon (S).
The part where this might get a little confusing is applying the R in the FORKS acronym, as there isn’t a designation with this letter. Post favored catchy and easy to remember, over accuracy, when choosing her words.
Some like to assign the butter knife and bread plate to the “R”. Place a butter knife across the bread plate horizontally and if you plan to serve dessert at the table, add a small spoon above the plates facing the same direction.
Keep in mind, when serving multiple courses, you will need more flatware available to guests. Also consider any extra flatware the menu calls for, such as an oyster fork (this would go to the right of the spoon, the only time a fork is ever placed on that side).
Pro tip: Having both a fork and spoon makes pasta much easier to eat. If you opt to include a pasta spoon, place it to the right of the soup spoon, or in lieu of it.
Step 6: Plates Please
Now you’re ready to plate each setting. Start with a charger plate if you’re going for a formal look (forgo it if your meal is more casual).
Add a main course plate on the charter, layered with a smaller plate on top for salad or side dishes.
Layer a soup bowl on top of the salad plate if the menu calls for it.
Whether your meal is formal or informal, a side dish for bread and butter should always go above and to the left of the place setting, separate from the plate stack for main dishes.
If guests will be serving themselves, choose serving dishes that are the right size and temperature to pass around. Avoid anything that might be hard to carry with one hand.
“I recommend dividing each side dish across two or three plates and placing them around the table so that everything is within reach to everyone,” Windell says.
Step 7: Drink Decoder
Too many glasses at each place setting can end up looking messy. “You don’t want it to look like a wine tasting with a bunch of glasses,” Windell says.
Start with a glass for water and one for wine and place them both above and slightly to the right of each place setting. The general rule is to place the larger or taller glass in the back.
Most experts no longer adhere to rigid rules about the types of glasses you use. “ When glasses are different sizes and styles, they’re more interesting to look at and make the most of the space,” adds Windell.
If your meal will have wine pairings, place the glasses in the order they will be used, so that the first is closest to the place setting.
If you’re not pairing wines but you think guests may switch from red to white wine or vice versa, add just one extra glass at each setting. For any guest who chooses not to drink wine or opts to hold on to their pre-dinner cocktail, do a quick sweep of the table after the first course to remove the extra glass.
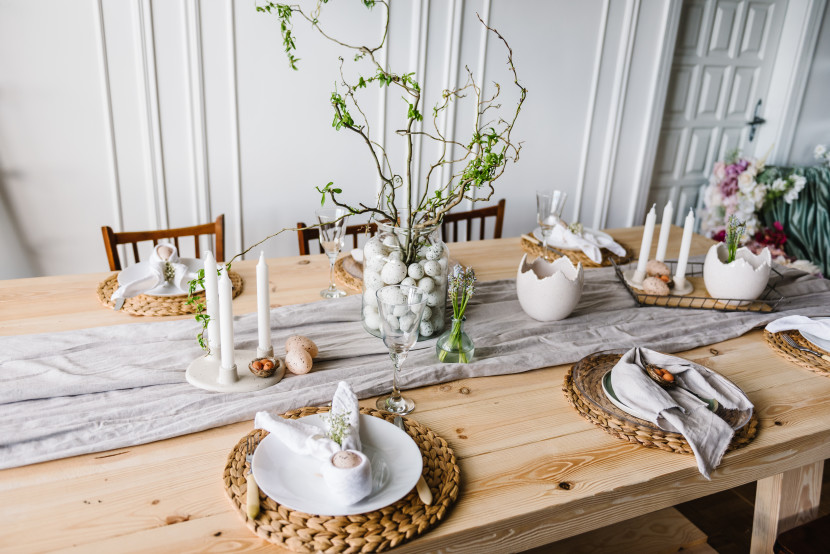
Step 8: Napkin Know-How
Where the napkin goes and how it’s folded has to do with preference and décor.
“A flat fold or small square on top of the salad plate is perfectly acceptable,” Windell says.
Also popular is what’s known as the candle fold, whereby the napkin stands in the center of the setting, on top of the plate, making a great impression when guests arrive at their seat. If you’re serving soup, fold the napkin into a flat square or rectangle and place it to the left of the plate, under the fork.
Napkin rings also can be a great accent to tie the décor to each setting. If you opt for those, the napkin should go on top of the salad plate or soup bowl, whichever is on top.
Whatever you do, remember that table setting may be an art but there is no perfectly right or downright wrong way to do it anymore, just general guidelines. At the end of the day, nothing beats a delicious meal enjoyed in great company.
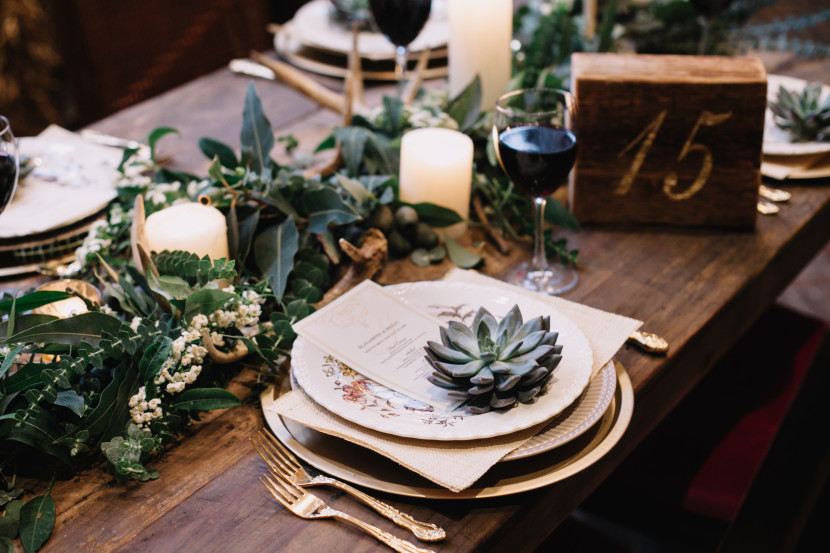
Step 9: Details in the Decor
Dishes and decor should complement the items on the menu. Delicate dishes call for delicate china, perhaps a cream plate with a thin rim of rose gold, while heavier meals look best on sturdier dishware.
Centerpieces add wow factor, but they can do more harm than good if they get in the way.
“Keep centerpieces low, so that everyone can easily see and talk to each other around the table,” Windell says. “Less is usually more.”
A trending and sensible centerpiece is a garland, wrapped with twinkle lights, sitting low, but adding style without taking up too much real estate on the table. Also trending: charcuterie board centerpieces fashioned out of rich natural wood. As a bonus, this does double-duty as a serving piece.
Or, try placing several smaller accents on the table instead of one massive centerpiece. “Uneven numbers look better than pairs,” Windell says. “It provides a better flow to the eye and creates a nice table silhouette.”
If your meal takes place after 3 or 4 p.m., weave in candlelight whenever possible, even if it’s just a few short votives or elegant taper candles. Candlelight provides a soft, warm glow that’s great for both formal and informal gatherings.
Be careful not to fill the table with too many small décor items, especially those placed on top or next to each place setting. Guests have to move them to use the tableware, and they often don’t know exactly where to put them so they’re out of the way, which can be awkward.
You can also try placing them above every other place setting so the extra touches are visible to everyone but not in anyone’s way.
Step 10: Make a Memorable Kids Table
If your guests include the junior set, create a kids table just for them that is functional, fun and entertaining. The kids will enjoy themselves, and so will their parents, because they will be happily occupied at their just-for-them table.
Forgo the table linens for butcher paper, with a cup of crayons or washable markers at each place setting and encourage meal-time creativity.
Choose plastic plates and flatware in festive or primary colors.
Personalize each place setting for each pint-sized guest, with a place card with their name on it, and give them a sheet of stickers to decorate it.
Add small toys or party favors to each place setting.
You can keep the menu similar to the adult table, depending on what you are serving, but make portions bite-sized. Or, go for a kids menu, with popular finger foods, such as chicken fingers and fries, with chopped veggies, plated for each child when they sit.
If using a centerpiece, make it child-friendly, with a cartoon or craft theme.

Heather Wright
Heather Wright is a journalist with a background in real estate reporting and home design, décor and architecture. A design enthusiast and trend spotter, her work has appeared in various lifestyle publications across North America, with a focus on emerging trends and tech in design, sustainability, home renovations and new home construction. In addition to lifestyle writing, Heather's portfolio extends to personal and corporate finance and mining and resources.